Disclaimer: This post is not sponsored by anyone. The links and resources I recommend are a personal preference that I used in the past. Also, this post may contain nudity as the topic is figure drawing and the human body. You have been warned!
What is figure drawing?

Figure drawing is a sub-section of life drawing based on the human body. It focuses on capturing a models figure exactly as you see it.
The aim is to try and depict the models’ proportions. Depending on the amount of time you have, you may also choose to include a study of values. The more detail you can include, the more life-like the drawing is going to look.
The importance of figure drawing
Life drawing is important to a concept artist. Here are the top 5 reasons why you should consider upping your figure drawing game:
1. It improves your character concept art.
The most obvious reason is that good character design should look proportionate. This rings true especially if you draw humans or humanoid creatures. You can improve this by studying the figure and real-life observations.
2. Your characters look more believable.
Your characters look more human if they reference real-life anatomy. This helps you to relate to them more. As people, we connect better with things that have more human-like qualities.
3. You draw better poses.
When figure drawing, you’ll be drawing people from many different angles and poses. This increases your visual library when creating characters.
4. You nail down your anatomy and proportions.
Proportions are hard to get right especially if you are new to drawing people.
We’ve all been there before.
You know… The struggle of trying to get your character to look… not weird? Yep, I get it.
Erasing and redrawing. More erasing and more redrawing.
Your paper is barely holding up from all the failed attempts. Your pencil is so blunt, the lead is hiding in the wood. There’s eraser dust flying everywhere, and your cat is staring at you like you’re a madman because of that weird expression on your face.
Relax.
Don’t curl up into a ball and cry the night away yet.
By practising figure drawings with real people, you’ll learn where to place parts of the body. As a result, your characters will look a million times better!
5. You get better at construction.
After a while of practice, everything comes together. You’re a natural.
You’ll learn how to break the body up into larger chunks. This helps you to block in an accurate framework of your character much quicker.
But Chaos, I want to draw cartoons. What’s the point?

The thing about life drawing is that its principles are universal. Cartoons are just real life drawings without a lot of detail. Artists creating manga or Disney style drawings take facial features and simplify it. It makes the characters look cartoon whilst still looking in proportion.
It’s always best to build your drawing foundation on real life and exaggerate to your liking. This is how many artists find their style!
How to create figure drawings
“Alright this information is all good and that but how I actually create figure drawings?”
I read your mind there…
Before I get to the good stuff, you’ll have to first read the 10,000-word essay I’ve written on the history of figure drawing…
Just kidding! 😉
Although before you start, you’re going to need to prepare. Here are two important things to get you started:
Materials you will need
This depends on personal preference. Use what is most comfortable for you. If you are getting started, go old school and use a sketchbook and some pencils. Don’t worry about being fancy, it’s the person that makes the art, not the materials. Some art supplies are amazing though…
The reason to go with a pencil at first is that figure drawing needs to be fluid. It is also good for being precise when you need to add details to your sketch.
Other materials I’ve found that work well for this subject matter is chalk and charcoal. The reason is that it can help to produce fluid sketches and great for practising gesture. This is the motion of the figure and the way it bends into a pose. Often drawn using a few curved lines.
This is all personal preference and I encourage you to try what works for you and let me know.
Gathering references

The real secret to improving your figure drawing is drawing from actual figures. Go figure! (pun intended). No seriously, you start to learn the curvature and placement of the muscles. It would also teach you how to draw movement of the skeleton in a natural manner. Your two best options for this are:
1. Using real-life models.
Nothing beats observing a model first hand. There are little intricacies a picture can’t show. If you’re serious about improving your life drawing, sign up to your local figure drawing class ASAP!
2. Using online resources.
Not everyone has the time or money to pay for classes. Fortunately, there is another option that allows us to improve in the comfort of our own homes. Perfect for all the couch potatoes out there 🙂
Online resources are great for this. Professional studios take pictures of all kinds of models that you can draw from. Perfect for practising the human form in many different shapes.
There are great resources out there if you look hard enough like Proko’s YouTube channel. It has many great videos to help you nail the basics:
Another great resource is quick poses. It allows you to draw many pre-uploaded photos for you to practice your gesture drawing:
https://www.quickposes.com/en/gestures/timed
The types of figure drawing
Figure drawing comes in many different forms. Each of them helps you to practice a different technique. Let me tell you about the 3 main types:
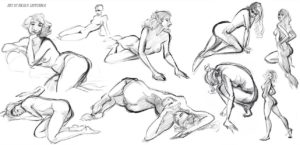
1. Long-form figure drawing
This is life drawing in a long session. In this exercise, you aim to get in as much detail as possible with an extra emphasis on the form and values. These drawings should have proper form, anatomy and perspective.
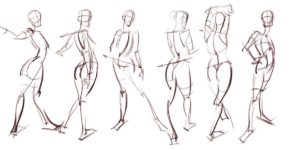
2. Gesture drawing
This is the opposite of long-form drawing. The focus of this exercise is to try and nail down the movement of the pose and the line of action as quickly as possible. When drawing gestures, try to be as loose and expressive as possible. The best gestures are able to capture the essence of the form.
3. Contour drawing
This is different from the two before. This exercise improves your ability to outline a pose without relying on a framework. When drawing contours, don’t shade at all. Try to draw exactly what you see.
Tip: My advice for improving your life drawing is to focus on gesture drawing and then do a long-form drawing.
Use 10 seconds to 1-minute gestures to warm up. Then practice gestures between 2-5 minutes and try to focus on the movement of the spine. Finish with a long form drawing between 10 and 30 minutes. Focus on the anatomy, proportions and values.
Don’t worry too much about contour drawing. Do them only if you want to and still have time left.
The stages of figure drawing
With all the preparation stuff out the way, let’s get to the fun part. There are four key stages when creating a figure drawing. I will use long form-figure drawing to highlight this.
1. Finding the line of action
The biggest mistake I see beginners make when drawing a figure is that they make the pose too stiff. This is usually a result of using straight lines instead of curves when drawing the body. Often this is learnt from anatomy books showing people standing in rigid poses.
Great when used if you’re starting out learning anatomy and proportion. However, it can become a bad habit that impacts your figure drawing.
Instead, you want to start off with the line of action. This is the general movement of the body defined in a single expressive curve. This helps keep your pose fluid and interesting. You can see a few examples of this done below (the white line).

2. Laying down the framework
Next up, you want to lay out a basic frame of the body you are trying to draw. Try to avoid using straight lines and instead use ‘C-shape’ and ‘S-shape’ curves to build up a figure.
Don’t worry about adding features at this point. Instead, try and make your model resemble that of a human. You can see some examples of this done below:
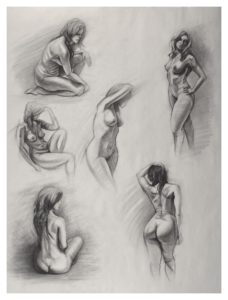
3. Refining and adding details
This stage is the most important. At this point, you want to clean up the edges and add line weight.
Line weight is when you thicken lines in parts of a drawings line art. This helps to establish depth by imitating shadows without any shading. It also helps to draw your attention to parts of the drawing whilst making the drawing easier to look at.
Don’t be afraid to detail out the face, hair and any clothes or accessories the model is wearing. This is the stage where your sketch should be as polished as possible (as much as a sketch can be).
4. Shading your study with values
Now you are ready to move on to the final stage. This will take much longer but is also the part that nets you the most reward.
Now you should be focusing on creating a strong contrast between the light and shadows. Aim to make the darks super dark and the lights super light. The biggest mistake I see beginners make when shading is that they make everything too light. Be bold!
Tip: Try not to shade everything because it pulls from the aesthetic. Be sure to keep some spaces free from any shading (works best on the parts that the lights hit).
Well, now you know a bit more about creating figure drawings. Be sure to practice what you’ve learned!
If you enjoyed this read, share it. Leave a comment down below if you have any questions or a suggestion for the next blog post. Also, don’t forget to follow our social media sites. You can find them here:
Stay tuned for more!